1_AzureSearch:
Estimated Time: 20-30 minutes
Azure Search
Azure Search is a search-as-a-service solution allowing developers to incorporate great search experiences into applications without managing infrastructure or needing to become search experts.
Developers look for PaaS services in Azure to achieve better and faster results in their apps. While search is a key to many types of applications, web search engines have set the bar high for search. Users expect: instant results, auto-complete as they type, highlighting hits within the results, great ranking, and the ability to understand what they are looking for, even if they spell it incorrectly or include extra words.
Search is a hard and rarely a core expertise area. From an infrastructure standpoint, it needs to have high availability, durability, scale, and operations. From a functionality standpoint, it needs to have ranking, language support, and geospatial capabilities.
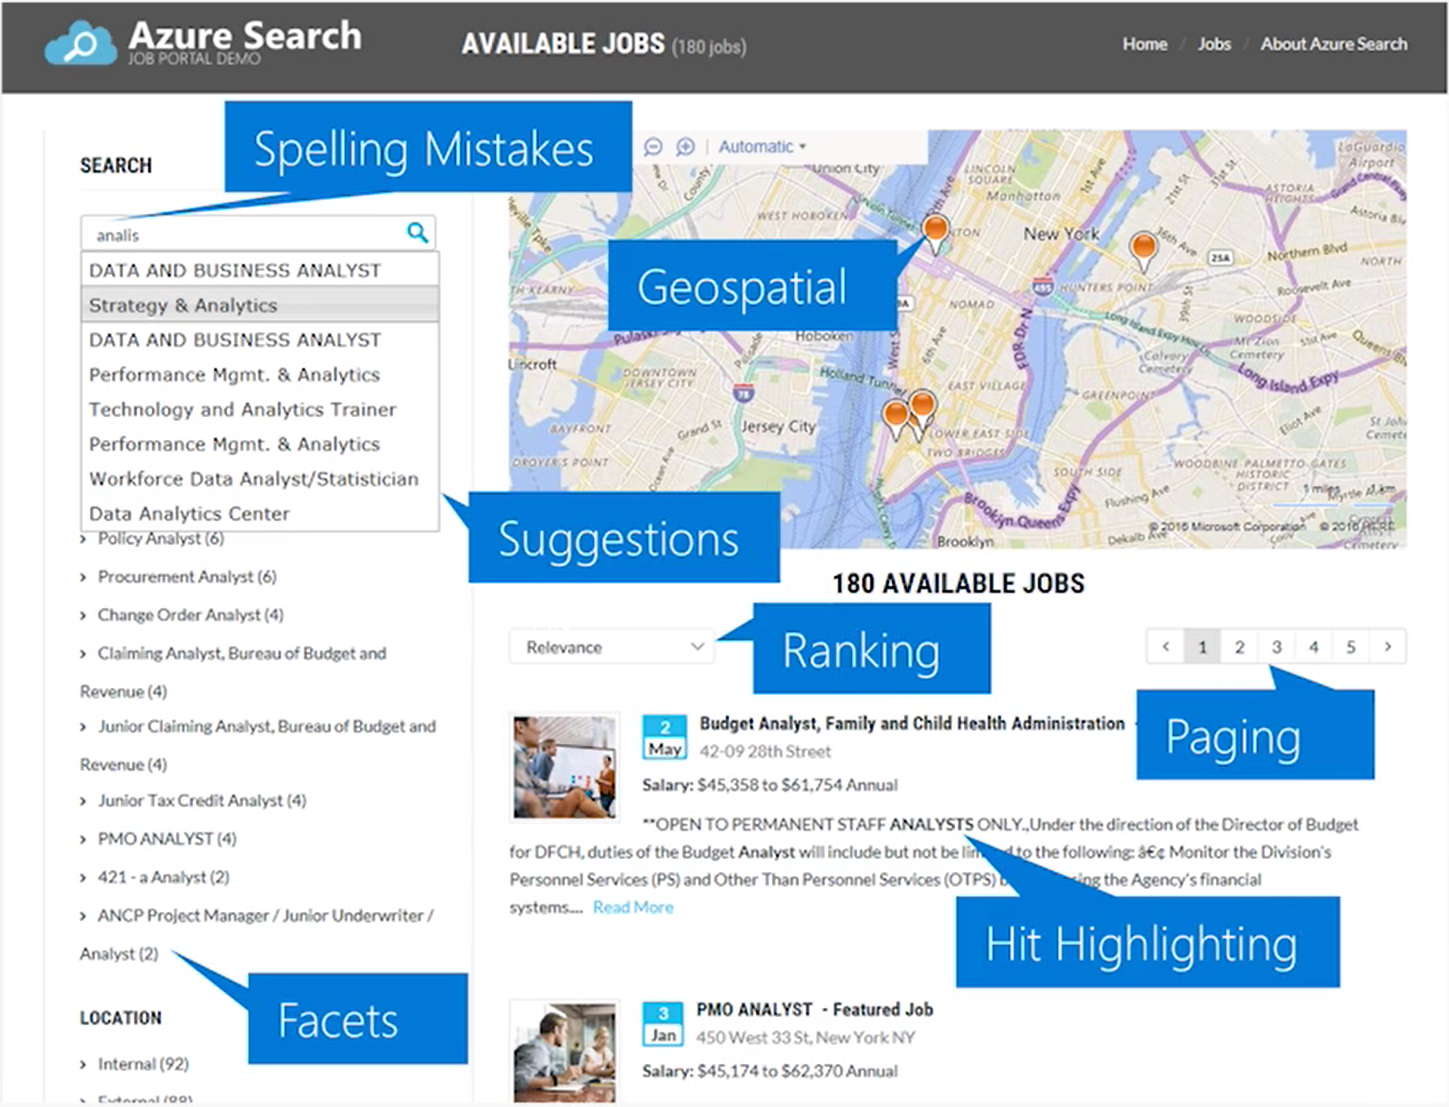
The example above illustrates some of the components users are expecting in their search experience. Azure Search can accomplish these user experience features, along with giving you monitoring and reporting, simple scoring, and tools for prototyping and inspection.
Typical Workflow:
- Provision service
- You can create or provision an Azure Search service from the portal or with PowerShell.
- Create an index
- An index is a container for data, think “table”. It has schema, CORS options, search options. You can create it in the portal or during app initialization.
- Index your data
- There are two ways to populate an index with your data. The first option is to manually push your data into the index using the Azure Search REST API or .NET SDK. The second option is to point a supported data source to your index and let Azure Search automatically pull in the data on a schedule.
- Search an index
- When submitting search requests to Azure Search, you can use simple search options, you can filter, sort, project, and page over results. You have the ability to address spelling mistakes, phonetics, and Regex, and there are options for working with search and suggest. These query parameters allow you to achieve deeper control of the full-text search experience.
Lab 1.1: Create an Azure Search Service
Within the Azure Portal, click Create a resource, enter “azure search” in the search bar, and click Azure Search->Create.
Once you click this, you’ll have to fill out a few fields as you see fit. For this lab, the “F0” free tier is sufficient. You are only able to have one Free Azure Search instance per subscription, so if you or another member on your subscription have already done this, you will need to use the “Basic” pricing tier. Use the one Resource Group for all of the labs in this workshop. If you already have a resource group for this workshop, just use that one. Put in one of the following locations: West US 2, East US, West Europe, Southeast Asia.
Once creation is complete, open the panel for your new search service.
Lab 1.2: Create an Azure Search Index
An index is a persistent store of documents and other constructs used by an Azure Search service. An index is like a database that holds your data and can accept search queries. You define the index schema to map to the structure of the documents you wish to search, similar to fields in a database. These fields can have properties that tell things such as if it is full text searchable, or if it is filterable. You can populate content into Azure Search by programmatically pushing content or by using the Azure Search Indexer (which can crawl common datastores for data).
For this lab, we will use the Azure Search Indexer for Cosmos DB to crawl the data in the Cosmos DB collection.
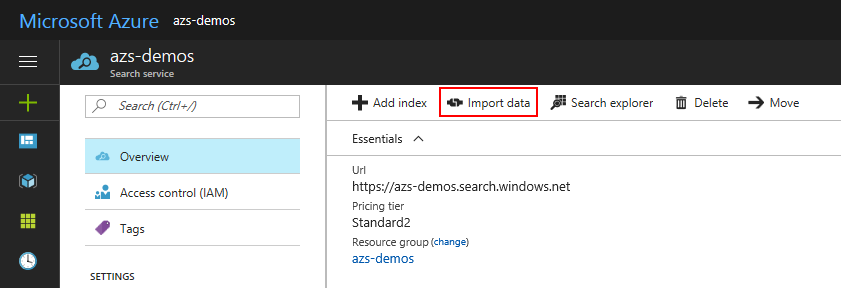
Within the Azure Search blade you just created, click Import Data->Data Source->Cosmos DB.

Once you click this, choose a name for the Cosmos DB data source. If you completed the previous lab, lab01.1-computer_vision, choose the Cosmos DB account where your data resides as well as the corresponding Container and Collections. If you did not complete the previous lab, select “Or input a connection string” and paste in the connection string: AccountEndpoint=https://anthobootcampdb.documents.azure.com:443/;AccountKey=XzxwNshrS92RAycyikcSNLOtrDdTMQIYsOHDLko22QDHVCNi4b3YW7pqrzhDPZJupwelnlABrqY4m3nCr686Yw==;. For both, the Database should be “images” and the Collection should be “metadata”.
Click OK.
At this point Azure Search will connect to your Cosmos DB container and analyze a few documents to identify a default schema for your Azure Search Index. After this is complete, you can set the properties for the fields as needed by your application (e.g. you can “Customize target index”).
Note: You may see a warning that “_ts” fields are not valid field names. You can ignore this for our labs, but you can read more about it here.
Note: You may notice that you are offered the option to “add congitive skills”. You can ignore this for now.
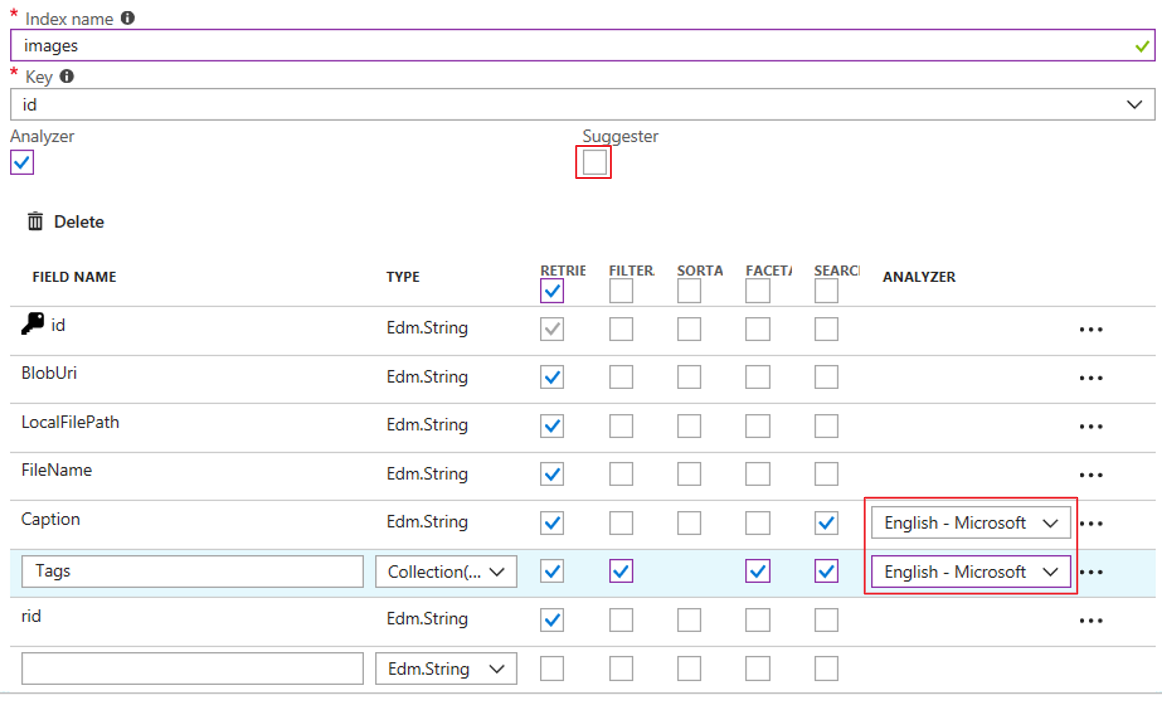
Update the Index name to: images
Update the Key to: id (which uniquely identifies each document)
Set all fields to be Retrievable (to allow the client to retrieve these fields when searched)
Set the fields Tags to be Filterable (to allow the client to filter results based on these values)
Set the fields Tags to be Facetable (to allow the client to group the results by count, for example for your search result, there were “5 pictures that had a Tag of “beach”)
Set the fields Caption and Tags to be Searchable (to allow the client to do full text search over the text in these fields)

At this point we will configure the Azure Search Analyzers. At a high level, you can think of an analyzer as the thing that takes the terms a user enters and works to find the best matching terms in the Index. Azure Search includes analyzers that are used in technologies like Bing and Office that have deep understanding of 56 languages.
Click the Analyzer checkbox and set the fields Caption and Tags to use the English-Microsoft analyzer.
For the final Index configuration step, we will create a Suggester to set the fields that will be used for type ahead, allowing the user to type parts of a word where Azure Search will look for best matches in these fields. To learn more about suggestors and how to extend your searches to support fuzzy matching, which allows you to get results based on close matches even if the user misspells a word, check out this example.
Click the Suggester checkbox and enter a Suggester Name: sg and choose Tags to be the fields to look for term suggestions

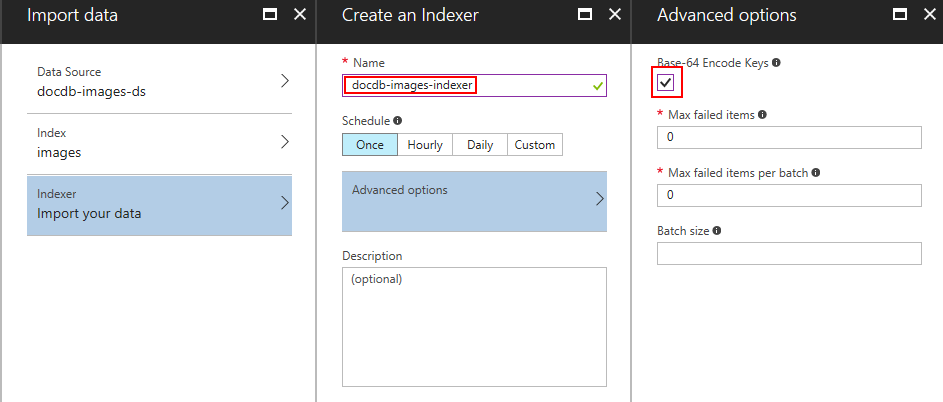
Click OK to complete the configuration of the Indexer.
Next, we configure how to “Import your data”. You could set at schedule for how often the Indexer should check for changes, however, for this lab we will just run it once.
Click Advanced Options and choose to Base 64 Encode Keys to ensure that the ID field only uses characters supported in the Azure Search key field.
Click OK, three times to start the Indexer job that will start the importing of the data from the Cosmos DB database.
Query the Search Index
You should see a message pop up indicating that Indexing has started. If you wish to check the status of the Index, you can choose the “Indexers” option in the main Azure Search blade.
At this point we can try searching the index.
Click Search Explorer and in the resulting blade choose your Index if it is not already selected.
Click Search to search for all documents. Try searching for “water”, or something else, and use ctrl+click to select and view the URLs. Were your results what you expected?
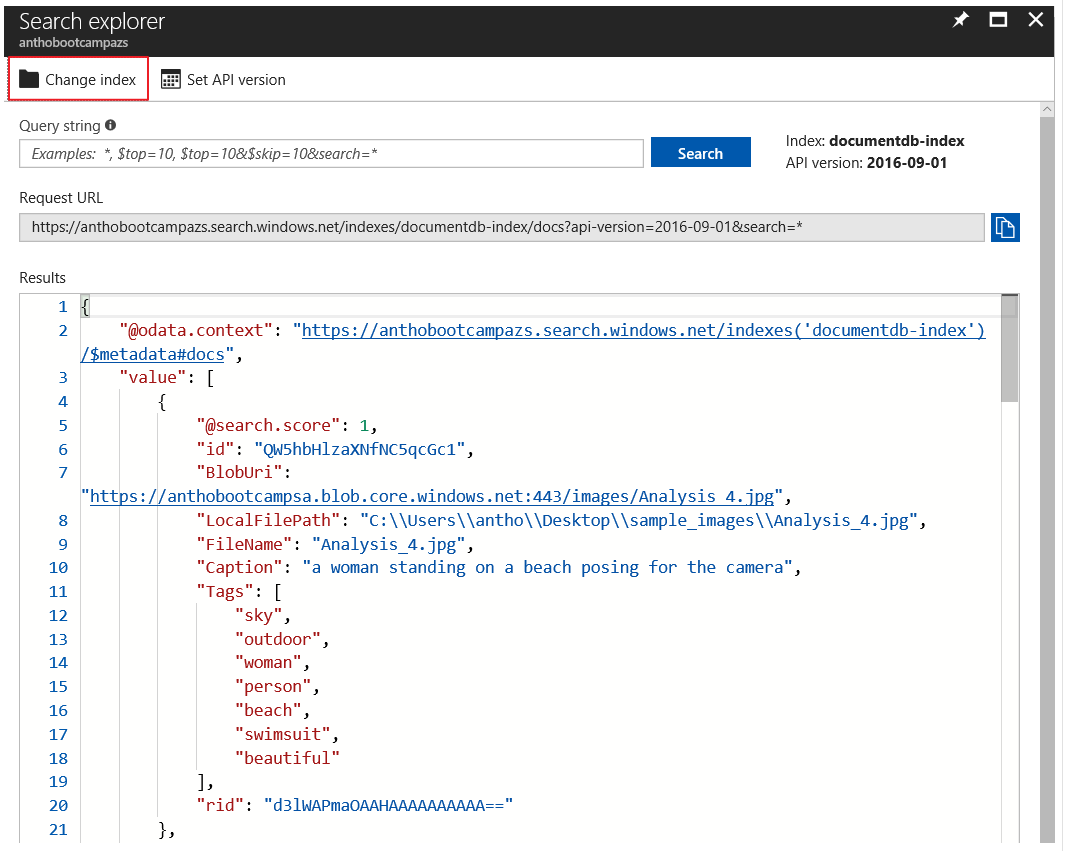
In the resulting json, you’ll see a number after @search.score. Scoring refers to the computation of a search score for every item returned in search results. The score is an indicator of an item’s relevance in the context of the current search operation. The higher the score, the more relevant the item. In search results, items are rank ordered from high to low, based on the search scores calculated for each item.
Azure Search uses default scoring to compute an initial score, but you can customize the calculation through a scoring profile. There is an extra lab at the end of this workshop if you want to get some hands on experience with using term boosting for scoring.
Finish early? Try this extra credit lab:
Postman is a great tool that allows you to easily execute Azure Search REST API calls and is a great debugging tool. You can take any query from the Azure Search Explorer and along with an Azure Search API key to be executed within Postman.
Download the Postman tool and install it.
After you have installed it, take a query from the Azure Search explorer and paste it into Postman, choosing GET as the request type.
Click on Headers and enter the following parameters:
- ContentType: application/json
- api-key: [Enter your API key from the Azure Search portal under the “Keys” section]
Choose send and you should see the data formatted in JSON format.
Try performing other searches using examples such as these.
Looking to add cognitive skills to your Azure Search Service? Check out these labs and the documentation to learn about Cognitive Search.
Back to README